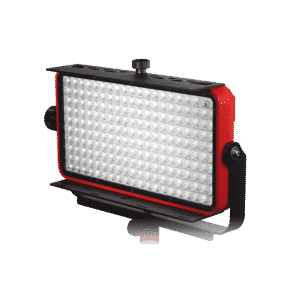
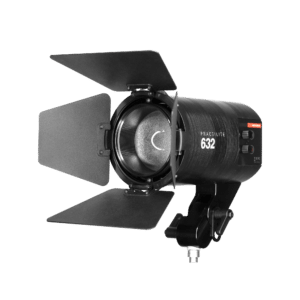
Practilite Smart Fresnel Lights Range

Practilite Fresnels are World's first and most compact bi-color, variable beam smartphone controlled LED lights.
All Practilites come with an app for smartphones and are Bluetooth capable.
The remote function is cost-effective and especially useful for single-person shooters or small crews when a gaffer is not available.
Also, it makes documentary shooting and field interviews more efficient as managing the lighting setup and adjustments can now be done with greater ease.
All Practilite Fresnels can be operated on external batteries.
Greater light range
The classic Fresnel lens enables wider shot angles and precise light-shaping without losing the LED output power/throw, which is typically the case with non-lensed fixtures. It is designed to gather and throw as much light as possible through its 3.2" 80mm diameter aperture, providing unprecedented size to output ratio equal to battle proven 300W Tungsten Fresnels.
Variable color temperature
In todays varing production environments, its not about ”Tungsten" anymore. Be it Fluorescent, LED, halogen and other types of lighting, our Practilites are just the right tools to adapt to these various lighting conditions.
Tune color balance or brightness
From tungsten to daylight and any lighting situation in between, you just dial in the matching color balance and tune the brightness manually or from your smartphone.
Flicker free, compact and durable
Practilite Fresnels are flicker free, at all frame rates. The series is compact and durable. Its CNC machined aluminium construction allows safe, easy and cost
effective transportation.
The universal AC/DC power supply is internationally adaptable.
Practilite 600
Practilite 600 is our most compact fixed beam Fresnel light enabling wide and even beam to light wider areas evenly. Its also a good companion to small pop-up softboxes to generate softer shadows.
- Fixed wide beam angle
Practilite 602
Practilite 602 is vatiable beam led Fresnel light which provides user with fast setup and fine light shaping capabilities that Fresnel lights are known for.
- Variable beam angle
- Barndoors included
Practilite 604 DMX
Practilite 604 DMX is the most advanced of the Practilite compact LED Fresnel family. Its ideally suited for permanent and semi-permanent installations where compact DMX enabled Fresnel lights can be utilized. Places like small and home studios for vlogging or even for high quality gallery lighting. Smart Sync Connectivity enables synchroneous control from one Master fixture.
- Variable beam angle
- Barndoors included
- DMX capability
- Smart Sync Connectivity
- Traditional balanced yoke
Specific feature highlights
- Smoothly adjust brightness and color temperature via smartphone or local controls next to bright OLED screen readout
- Fresnel lens 3.2" (80mm), borosilicate glass
- Tunable color temperature from 3000K to 6000K
- CRI ≤96
- Flicker free at all frame rates
- Safe Boost Mode for increased light output, up to 15000lx in spot** mode, 4700lx in flood mode
- Clean beam output without any visible artifacts due to state of the art COB technology
- Max current draw 90W
- 100-240 VAC, 12-28 VDC, can be operated from V-mount and Gold Mount batteries
- Silent hybrid cooling system
- Attaches to any standard 5/8" (16 mm) baby pin
- Housing diameter 4"/100mm, compatible with third party 4"/100mm studio light modifiers.
- Speedring insert adapters for most manufacturers soft-boxes are available separately
- Easily control up to 6 fixtures via effortless Bluetooth LE connection within 30 feet range
Photometrics
* Boost Mode at neutral white 4500K color temperature
Frequently Asked Questions
What are the benefits of a bi-color fresnel instrument?
The color balance feature is specially useful when using Practilite instruments along with other lights be it practicals on location or existing instruments in studio.
Does the light output vary when the color balance is changed?
Unlike most of bi-color fixtures the light output does not change when the color temperature is changed from daylight to tungsten so the exposure can remain the same further speeding up the lighting setup.
How does the luminous output compare to a traditional Fresnel fixture?
Practilite 602 compares well to a 300W Fresnel fixture but size wise it's much smaller than Arri 300, in Boost Mode at 4500K it compares to a 500W fixture.
How does the Boost Mode work?
In boost Boost Mode the light output becomes non-linear and peaks at 4500K resulting in 1/2 stop more light output which can be handy when using a softbox.
What is the actual measured light output at 1m/3.3 ft?
The light output is 10000lx or 930fc for spot and 3100lx or 290fc for flood.
Where can I find more information about photometrics?
More information about light output and beam spreads can be found here.
What are the CRI and TLCI?
The typical CRI and TLCI values are 96 for tungsten and 92 for daylight.
Is it DMX controllable?
It has wireless remote control via smart device's Bluetooth connection and has an app to do so but only Practilite 604 supports DMX control.
Where can I get the app and does it cost extra?
The app "Practilite Remote Control" is available free of charge from App Store and from Google Play.
How many fixtures can I control from the app?
It supports up to 6 units a one time. Or in the case with 604 one can use up to 90 units in 6 daisy-chained groups (15 per group)
What parameters can be controlled from the app?
The light intensity and color balance, of course ON/OFF and the "Boost Mode".
What types of accessories does it accept?
It is compatible with Profoto 4" / 100mm diameter mount so if you need a softbox you can start with Profoto compatible accessories either from Chimera or from Profoto.
Can it be powered by batteries?
Yes, the instrument can be powered via optional Gold or V-Mount battery plates.
Which battery plate should be used as recommended accessory?
We recommend using battery plates with integrated 4-pin XLR cable.
How long would be the average run time?
Well, it depends heavily on the battery capacitance, on average it is around two hours for medium sized battery pack.
Which batteries do you recommend?
We recommend high quality batteries from well known manufacturers like IDX, Anron Bauer, PAG, Blueshape etc.
Is the power supply unit on board?
No, the AC adapter is external to keep the fixture as small and light weight as possible.
So that means I can use it on much lighter stands too?
Yes, that was the intention when we designed the instrument, specially for travel and on location shooting, events and so on.
How does the weight compare to the Arri 300 Fresnel?
Practilite 602 weights only 1.3kg despite it's all metal construction whereas Arri 300 weights 2,9kg so the difference is quite significant.
LCDVF Optical Viewfinder Range

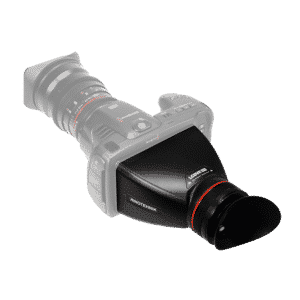
LCDVF turns your cameraʼs LCD screen into a huge electronic viewfinder for precise image evaluation.
In the heart of the LCDVF is an achromatic lens pair that consist of two optical components vacuumcemented together to form an achromatic doublet which is computer optimized to correct for on-axis spherical and chromatic aberrations. Similar quality of optics is rarely to be seen in even professional broadcast equipment.
Simple & safe mounting
The search for a perfect mounting option eventually led us to creating universal magnetic interface that allows rapid mounting and demounting without any wear and tear. All you need to do is apply adhesivecovered ultra-sleek metal frame to your camera body and from there on, itʼs click-on, click-off: simple and safe.
Specifications
- Aperture diameter: 40mm
- Magnification: 220%
- Body material: Impact resistant ABS
- Eyecup: Skin friendly silicone rubber
- Eyecushion: Bluestar microfiber
- Universal mounting interface: Galvanized and powder coated metal shield
- Weight: 110g / 3.84 oz


Features
- Lets you shoot photos and video in direct sunlight
- Stabilizes camera when shooting video handheld
- Aids on-the-fly focusing
- Allows the use of LCD in bright daylight outdoors
- Magnification of 220% specially tailored to most 3" LCD screens
- AR coated and optically corrected lens with 40mm clear aperture
- Robust and durable: no moving parts, splash and dust proof
- 180 degrees flipping design allows instant left or right eye usage
- Universal magnetic mounting interface allows rapid mounting and demounting without any wear and tear
- Allows the use of battery and wireless grip and all other original accessories
- Flat mounting interface allows easy cleaning of the LCD screen
- At most cases all LCDVFs are usable with prescription ranging from +0.5 to -2
- In addition, all LCDVF models now come with built-in 37mm metal thread that can accommodate diopter correction lenses (to be purchased separately)
Compatibility
LCDVF comes in a number of variations and is compatible with many cameras with 3”, 3.2" and 3.5" screens.
Please always refer to this page for the latest compatibility information.
Frame measurements
LCDVF modification: | 4/3 | 3/2 | 16/9 | 3C | 4N | BM |
---|---|---|---|---|---|---|
![]() |
||||||
Pocket Cinema Camera | BM | |||||
![]() |
||||||
Canon EOS R | 3/2 | |||||
Canon EOS 77D / EOS 9000D | 3/2 | |||||
Canon EOS-1D X Mark II | 3C | |||||
Canon EOS Rebel T7i / EOS 800D / Kiss X9i | 3/2 | |||||
Canon PowerShot G9 X Mark II | 3/2 | |||||
Canon EOS M5 | 3C | |||||
Canon EOS 5D Mark IV | 3C | |||||
Canon EOS Rebel T6 (EOS 1300D) | 4/3 | |||||
Canon EOS 80D | 3/2* | |||||
Canon PowerShot G7 X Mark II | 3/2 | |||||
Canon PowerShot G5 X | 3/2 | |||||
Canon PowerShot G3 X | 3C | |||||
Canon XC10 | 3/2 | |||||
Canon EOS 5DS | 3C | |||||
Canon EOS 5DS R | 3C | |||||
Canon EOS Rebel T6s (EOS 760D / EOS 8000D) | 3/2 | |||||
Canon EOS Rebel T6i (EOS 750D / Kiss X8i) | 3/2 | |||||
Canon EOS 7D Mark II | 3/2 | |||||
Canon EOS 1200D (Rebel T5 / Kiss X70) | 4/3 | |||||
Canon EOS 70D | 3/2* | |||||
Canon EOS Rebel SL1 (EOS 100D) | 3/2 | |||||
Canon EOS 700D (EOS Rebel T5i / EOS Kiss X7i) | 3/2* | |||||
Canon EOS 5D MK IV | 3C | |||||
Canon EOS 5D MK III | 3C | |||||
Canon EOS 5D MK II | 4/3 | |||||
Canon EOS 1DX | 3C | |||||
Canon EOS 1DC | 3C | |||||
Canon EOS 1D MKIV | 4/3 | |||||
Canon C100 | BM** | |||||
Canon EOS 6D | 3/2 | |||||
Canon EOS 7D | 4/3 | |||||
Canon EOS 50D | 4/3 | |||||
Canon EOS 60D | 3/2 | |||||
Canon EOS 70D | 3/2 | |||||
Canon EOS 550D/T2i/X4 | 3/2 | |||||
Canon EOS 600D/T3i/X5 | 3/2* | |||||
Canon EOS 650D/T4i | 3/2* | |||||
Canon EOS 700D (EOS Rebel T5i) | 3/2 | |||||
Canon EOS 500D/T1i/X3 | 4/3 | |||||
Canon S90 | 4/3 | |||||
Canon G10 | 4/3 | |||||
![]() |
||||||
Nikon D850 | 3C | |||||
Nikon D7500 | 4/3** | |||||
Nikon D3400 | 4/3 | |||||
Nikon D500 | 4/3** | |||||
Nikon D5 | 4/3** | |||||
Nikon D7200 | 4/3** | |||||
Nikon D810A | 4/3** | |||||
Nikon D5500 | 4/3** * | |||||
Nikon D750 | 4/3** | |||||
Nikon D4S | 4/3** | |||||
Nikon D3300 | 4/3 | |||||
Nikon Df | 4/3** | |||||
Nikon D7100 | 4/3** | |||||
Nikon D600 | 4/3** | |||||
Nikon D4 | 4/3** | |||||
Nikon D810 | 4N | |||||
Nikon D800 | 4N | |||||
Nikon D5100 | 4/3 | |||||
Nikon D5200 | 4/3 | |||||
Nikon D7000 | 4/3 | |||||
Nikon D3100 | 4/3 | |||||
Nikon D3200 | 4/3 | |||||
Nikon D300s | 4/3 | |||||
Nikon D90 | 4/3 | |||||
Nikon D3s | 4/3 | |||||
Nikon S8100 | 4/3 | |||||
Nikon P7000 | 4/3 | |||||
Nikon P300 | 4/3 | |||||
Nikon Coolpix AW100 | 4/3 | |||||
Nikon Coolpix P310 | 4/3 | |||||
Nikon Coolpix L820 | 4/3 | |||||
![]() |
||||||
Pentax K-1 | 3C | |||||
Pentax KP | 3/2 | |||||
Pentax K-70 | 3/2* | |||||
Pentax K-S2 | 3/2* | |||||
Pentax K-7 | 4/3 | |||||
Pentax K-5 | 4/3 | |||||
Pentax K-r | 4/3 | |||||
Pentax K-01 | 4/3 | |||||
![]() |
||||||
Fujifilm GFX 50S | 4/3* | |||||
Fujifilm X-T2 | 3/2 | |||||
![]() |
||||||
Panasonic AU-EVA1 | BM | |||||
Panasonic Lumix DC-GH5 | 3C* | |||||
Panasonic Lumix DMC-G7 | 3/2 | |||||
Panasonic LX100 | 16/9 | |||||
Panasonic GF1 | 16/9 | |||||
Panasonic GF2 | 16/9 | |||||
Panasonic DMC-GF3 | 16/9 | |||||
Panasonic DMC-GF5 | 16/9 | |||||
Panasonic GH1 | 16/9 | |||||
Panasonic GH2 | 16/9 | |||||
Panasonic GH3 | 3/2 | |||||
Panasonic GH4 | 3/2 | |||||
Panasonic GX7 | BM | |||||
![]() |
||||||
Sony Alpha a9 | 4/3 | |||||
Sony Alpha 7S II 7S II 7RII | 4/3 | |||||
Sony Alpha a6500 | 16/9 | |||||
Sony Alpha a6300 | 16/9 | |||||
Sony Alpha a5100 | 3C | |||||
Sony Cyber-shot DSC-RX100 V | 4/3 | |||||
Sony Cyber-shot DSC-RX100 IV | 4/3 | |||||
Sony Cyber-shot DSC-RX10 III | 4/3 | |||||
Sony Cyber-shot DSC-RX10 II | 4/3 | |||||
Sony Cyber-shot DSC-RX1R II | 4/3 | |||||
Sony Cyber-shot DSC-RX1R | 4/3 | |||||
Sony A7 A7R | 4/3 | |||||
Sony A6000 | 16/9 | |||||
Sony SLT-A99 | 4/3 | |||||
Sony SLT-A57 | 4/3 | |||||
Sony SLT-A77 | 4/3 | |||||
Sony SLT-A65 | 4/3 | |||||
Sony DSC-RX100 | 4/3 | |||||
Sony DSC-HX9V | 4/3 | |||||
Sony NEX-5N | 16/9 | |||||
Sony NEX-5R | 16/9 | |||||
Sony NEX-5 | 16/9 | |||||
Sony NEX-7 | 16/9 | |||||
Sony NEX-3 | 16/9 | |||||
Sony NEX-C3 | 16/9 | |||||
![]() |
||||||
Sigma Quattro | 4/3 |
List updated: March 2019
* Please test before purchasing, if possible. The magnets may interfere with camera's LCD shut-off sensor in some rare cases.
** Please note that LCDVF metal frame will not allow to completely close the LCD screen.
In the box:
- LCDVF viewfinder loupe
- 2x mounting frames (1x for LCDVF 4N)
- Microfiber eyecushion
- Protective neoprene pouch
- Lanyard
- Cleaning cloth
- User manual
Photos
Videos
This video preview will be part of my full review of the newly released LCDVF Loupe-style viewfinder for hybrid digital SLR's. My full review will be coming within the next week or so, after I have had a chance to use it out in the field over the upcoming weekend.
Attaching the LCDVF to a 5D MKII.
Isn't the interface frame sleek? Almost invisible.
Magnetic power of the LCDVF mounting system.
Low profile (1.25mm) mounting frame allows for easy cleaning of the LCD screen. This frame is not a magnetic one as some would think after reading some intentionally incompetent reviews.
Recently I went to Beijing and did a not-so-traditional take on the Communist Party's annual meeting. If I had to shoot liveview with the T/S lens and without the LCDVF, I would not have been able to focus as well and I would have lost tons of pics.
David Høgsholt is based in Shanghai and represented by reportage by Getty Images
Review on Cameratown
by Ron Risman
Overall I am very impressed with the LCDVF. It is currently the best alternative to the Z-Finder and is quite a bit more affordable. It's magnetic mount holds the loupe firmly in place while shooting, yet makes it easy to pop-off when you're not. The 200% magnification of the LCD makes the 3.0" display look more like a "big screen" TV when viewing through the loupe, which in turn makes it easier to pull focus while recording.
» Read more (external link)
Review by Indiev
February 9, 2010
For the price, you can’t beat it. The 2x magnification seems perfect, any more and it would seem like pixel peeping to me. You can see the whole frame but also focus and look around the frame with no distortion. The LCDVF gets two thumbs up, 5 out of 5. I just can’t fault it.
» Read more (external link)
Gear News ja Reviews – LCDVF vs Z-Finder
November 20, 2009
Some type of a viewing system is critical for using a video DSLR. For me I’m going to be keeping the LCDVF. Both products are remarkably good in aiding you shoot video, but in the end money has to be a consideration and at $159, the LCDVF offers everything the Z-Finder does, with the exception of a diopter, for 60% less.
» Read more (external link)
Sound on Sound
October, 2010
This isn’t the cheapest accessory, or indeed the cheapest viewfinder, but it’s also far from the most expensive and is well engineered.
» Read more (external link)
Epic DSLR Viewfinder Review. Part 5: Essential DSLR accessories
by Nino Leitner
[...] for a budget setup, I think the LCDVF might be the perfect companion. Its magnetic attaching mechanism is very comfortable when put in practice - I left the LCDVF tangling around my neck when I didn’t use it, and it attaches with a snap and sits tightly and securely on the camera.
» Read more (external link)
LCDVF review
by Paul Joy
The LCDVF on the other hand makes it easier to focus, comes with a nice set of accessories, and is less likely to damage the LCD. Without a diopter adjustment though you’ll only be able to correct for eye condition by modifying it yourself.
» Read more (external link)
Any other reviews that should be here? Let us know!
The design of the device requires you to bond the metal frame to your camera body. It’s a straightforward process but still we suggest you read through the few bullet points.
Please carefully follow these instructions for bonding the metal interface frame to the camera body. In case of any questions, please let us know.
Before you start
- We advise NOT to use the soft screen protector in between the mounting frame and your camera!
- Instead, we recommend using rigid screen protectors which will not affect the outcome on cameras with articulating screen like Canon 60D and 600D/T3i/X5 or on Panasonic GH series.
- For maximum bond strength, the surface should be thoroughly cleaned. Cleaning with dry and clean lens cloth is sufficent as the adhesive tolerates little grease.
- Bond strength can be improved with moderate heat, from 100°F (38°C) to 130°F (54°C), causing the adhesive to develop improved contact with the bonding surface.
Ideal tape application temperature range is 70°F to 100°F (21°C to 38°C). - Initial tape application to surfaces at temperatures below 50°F (10°C) is not recommended because the adhesive becomes too firm to adhere securely.
Application guide
- Leave your camera recording for approximately 12 minutes before and just after the frame is applied - as the camera gets moderately warm during the recording, it helps to develop a stronger bond between the metal frame and camera body.
- You can also leave your camera recording without lens, just with the body cap on so you can safely put some weight onto the freshly applied interface frame, but be careful.
- While you apply the interface frame set your camera to display a bright full screen image, such camera menu in it's brightest state to aid the correct and even placement of the interface frame.
- We recommend that the round filleted tab shoud be in the upper right corner when applied Without removing the paper backing from the adhesive, practice few times on how should the frame be applied onto the camera body
- Now, remove the paper backing and carefully apply the frame onto the camera body while ensuring an even placement around the LCD
- Apply pressure (massage it with your fingers) to ensure better bond between the frame and camera
- Leave a weight onto the freshly applied frame at least for 15 minutes while your camera is recording as the heat generated will ensure a better fit, specially if you are in a hurry
- 3M™ adhesive used has 72 hours total dwell time as the adhesive conforms to surface irregularities although initial bond strength of approximately 76% is achieved within 15 minutes at room temperature.
Removing the metal frame from the camera body
- Do not use sharp objects to aid the removal! (Disposable plastic cutlery will do, but still be careful).
- Start the removal from the round filleted tab in the upper right or bottom left corner.
- Remove the frame gently and try not to bend it so you could reuse it (on Canon 5D the frame should come off as fully reusable)
- Use Citrus Cleaner for removing adhesive residues if needed.
- Carefully read and follow manufacturer's precautions and directions for use when using any cleaning solvents!
Removing the metal frame from the camera body
There are 4 small magnets embedded in the plastic skirt of the LCDVF. The mounting frame acts as an additional safety shield to further ensure your confidence in the magnetic mounting system.
These magnets will not damage your camera or any non-magnetic media such as CF or SD memory cards.
However, do not leave the LCDVF mounted on your camera for extensive periods (for days or weeks).
Keep a safe distance (20mm+) between the magnets and all objects that can be damaged by magnetism. These include mechanical watches, heart pacemakers,
CRT monitors and televisions, credit cards, diskettes and other magnetically stored media.
We do not accept responsibility for damage that has been caused by the improper handling of a LCDVF device.
Like all iconic products, LCDVF too has been a subject of numerous attempted counterfeits.
Furthermore, our trademark has become a common abbreviation for products of that kind.
Well, we take that as recognition – we have created something well worth copying.
But that is just one side of the story.
There are few things that you should certainly consider while being tempted by the „less costly alternatives“. Namely:
The Optics
The optics is the main difference. We use achromatic doublet lenses for best possible image quality. The costs of the lens make up a lot of the product’s final price tag. For a good reason, that is.

LCDVF does not distort the image and is easy for the eye, while wide angle lens shows severe visible lateral chromatic aberration.
With LCDVF, what you see is what you get.
Read more about the difference from Wikipedia

Build quality
All LCDVFs have superior build quality – best available materials, no squeaky cheap stuff, no shortcuts in design. Each unit is assembled and quality-checked in Europe. The original LCDVF looks and feels solid, while the counterfeit alternatives just do not.
Free eye cushion
We have included high-quality microfibre eyecushion by Bluestar in the bundle. Comes in especially handy when using glasses, also in extreme weather conditons.
Frames that stick
We use special 3M organic adhesive which is durable, yet easily removable. You wouldn’t like to damage your camera or re-attach the frames daily, would you?
Warranty
We offer two years of full warranty and customer support on all our products. Use with confidence - we've got your back.
Environment
A fake product is likely to have a shorter lifespan because of the quality issues. You end up spending more money and more resources when you have to repair or upgrade your "budget version" to a proper one.
Last but not least
Buying a counterfeit product is illegal and unethical. On the other hand, when buying the original LCDVF, you invest in continuous innovation. Thank you for supporting our hard work.
A wise man once said:
"We are not wealthy enough to afford buying cheap things".
Amen to that.
LCD ViewFinder is protected by registered EU Community designs No’s 001746116-0001, 001746116-0002, 001746116-0003. LCD ViewFinder and LCDVF are trademarks of LCDVF Plc